# Parota Plywood For Interior Decoration: Complete Design and Application Guide
The contemporary interior design landscape has witnessed a profound evolution in material philosophy—a decisive shift away from synthetic surfaces and artificial finishes toward authentic materials that convey warmth, tactile richness, and connection to natural origins. This transformation reflects deeper cultural currents: homeowners increasingly value spaces that feel genuinely welcoming rather than showroom-perfect; hospitality designers recognize that authentic materials create memorable guest experiences; commercial developers understand that distinctive interior environments command premium rents and attract quality tenants; and residential developers know that natural material palettes differentiate properties in competitive markets.
Within this context, **wood** has reclaimed its position as a foundational interior design material—not relegated to floors and trim as in previous decades, but deployed expansively across feature walls, ceilings, architectural panels, custom millwork, furniture integration, and spatial dividers. Yet the practical realities of using solid wood for large-scale interior applications create persistent challenges: dimensional movement causes warping and joint failures in wide panels; material costs escalate quickly when covering substantial square footage; structural weight limits certain applications; and installation complexity increases labor costs and project timelines.
For designers, architects, millwork fabricators, and contractors seeking materials that deliver premium hardwood aesthetics—distinctive grain character, warm natural coloration, organic visual texture—while providing the dimensional stability, large-format efficiency, structural predictability, and cost-performance advantages essential for practical interior applications, **parota plywood** presents a compelling solution that addresses these competing demands effectively.
This Mexican and Central American hardwood, engineered into plywood panels, combines the visual warmth and authentic character designers value with the technical performance and economic efficiency projects require. Parota’s golden-brown coloration and dramatic swirling grain patterns create immediate visual impact, while plywood construction provides the stability, workability, and cost structure that make ambitious interior design concepts achievable within realistic budgets and timelines.
Yet despite parota plywood’s increasing specification in high-end residential projects, boutique hospitality properties, upscale commercial spaces, and custom residential developments—particularly throughout Mexico, the southwestern United States, and increasingly across North America—comprehensive application guidance specifically addressing **interior decoration uses** remains limited. Designers evaluating the material need answers to critical application-specific questions: Which interior applications maximize parota plywood’s aesthetic impact while leveraging its structural advantages? How should the material be detailed, finished, and installed in various interior contexts? What lighting considerations enhance parota’s visual character? How does parota plywood coordinate with other materials in contemporary design palettes? What are realistic cost implications compared to alternative materials and construction methods?
This definitive design guide addresses these questions systematically, examining optimal interior decoration applications for parota plywood across residential, hospitality, commercial, and specialty projects. From analyzing aesthetic characteristics and performance requirements to providing specific installation recommendations and detailing design integration strategies, this comprehensive resource equips interior designers, architects, millwork specialists, contractors, and property developers with the knowledge to successfully specify and execute interior projects using parota plywood—creating distinctive spaces that balance visual impact, practical performance, and project economics.
—
## Understanding Parota Plywood’s Aesthetic Character: Design Foundation
Before examining specific applications, establishing a clear understanding of parota plywood’s visual characteristics provides the foundation for informed design decisions.
### Color Properties and Psychological Impact
**Natural Color Range:**
**Base Coloration:**
– **Primary tone:** Warm golden brown to medium tobacco brown
– **Spectrum range:** Light honey-blonde (sapwood) through rich caramel to deep chocolate brown (mature heartwood)
– **Natural variation:** Individual panels exhibit color variation creating visual interest
– **Transition zones:** Gradual color shifts within panels (sapwood-to-heartwood transitions)
**Undertones and Nuance:**
– **Golden highlights:** Honey and amber undertones catch and reflect light
– **Warm character:** No cool gray or green undertones—purely warm spectrum
– **Depth complexity:** Subtle color layering creates three-dimensional visual depth
– **Richness:** Substantial presence without heaviness (lighter than walnut, darker than maple)
**Color Evolution Over Time:**
– **Initial appearance:** Fresh-cut parota displays lighter golden tones
– **UV exposure:** Gradually darkens and enriches with light exposure
– **Patina development:** Develops attractive aged character over years
– **Finish impact:** Oil finishes deepen color immediately; clear finishes preserve lighter tones longer
**Design Psychology:**
**Emotional Associations:**
✨ **Warmth and welcome:** Golden-brown tones psychologically associated with comfort, hospitality
✨ **Natural authenticity:** Obvious real wood communicates craftsmanship, quality, permanence
✨ **Organic luxury:** Tropical hardwood association with resort environments, upscale hospitality
✨ **Approachability:** Warmer, more inviting than cool-toned woods (ash, white oak)
✨ **Timelessness:** Classic wood tones avoid trendy appearance that dates quickly
**Spatial Impact:**
– **Space warming:** Golden tones add warmth to cool-toned interiors (gray walls, concrete, metal)
– **Light reflection:** Moderate reflectivity brightens spaces without glare
– **Visual weight:** Substantial presence without dark-wood heaviness
– **Scaling appropriate:** Rich enough for statement applications, restrained enough for extensive coverage
### Grain Pattern Characteristics: Visual Texture and Movement
**Distinctive Grain Structure:**
**Interlocked Grain Pattern:**
– **Formation mechanism:** Growth pattern where grain direction alternates in successive layers
– **Visual result:** Three-dimensional appearance; grain appears to weave, flow
– **Unique character:** Dramatically different from straight-grained species (maple, cherry)
– **Dynamic quality:** Surface appearance changes with viewing angle
**Figure Types:**
**1. Cathedral/Crown Patterns:**
– **Description:** Classic arched “cathedral window” figures on flat-sawn faces
– **Formation:** Cutting plane intersects growth rings at angles
– **Design impact:** Creates vertical visual movement; emphasizes panel height
– **Applications:** Feature walls, tall panels, door designs emphasizing verticality
**2. Swirl and Ribbon Patterns:**
– **Description:** Dramatic swirling, flame-like patterns where grain shifts direction
– **Formation:** Interlocked grain combined with irregular growth patterns
– **Design impact:** Maximum visual drama; focal point quality
– **Applications:** Statement pieces, accent panels, artistic installations
**3. Straight/Rift Grain:**
– **Description:** More linear grain with subtle striping
– **Formation:** Quartersawn or rift-sawn cutting exposing edge-grain
– **Design impact:** Cleaner, more contemporary; less busy visually
– **Applications:** Modern minimalist designs, large expanses requiring visual calm
**Chatoyance (Light Play):**
**What It Is:**
– **Definition:** Surface appearance that changes with viewing angle as light reflects differently off alternating grain directions
– **Visual effect:** Wood appears to shimmer, move, come alive as viewer moves or light changes
– **Unique quality:** Distinguishes real wood from synthetic materials; photographs cannot capture fully
**Design Implications:**
✅ **Dynamic surfaces:** Walls, panels appear to have motion, depth, life
✅ **Lighting interaction:** Strategic lighting placement enhances chatoyance dramatically
✅ **Visual interest:** Provides decorative richness without applied ornamentation
✅ **Uniqueness:** Each installation truly one-of-a-kind due to natural variation
**Scale Considerations:**
**Small-Scale Applications:**
– **Grain visibility:** Individual grain patterns clearly visible
– **Character dominance:** Grain becomes primary design element
– **Visual activity:** High visual energy in smaller spaces
**Large-Scale Applications:**
– **Pattern emergence:** Overall pattern composed of individual grain variations
– **Balanced activity:** Large expanses allow eye to appreciate overall composition
– **Impact:** Dramatic effect without overwhelming space
### Surface Quality and Texture Options
**Factory-Sanded Plywood:**
**Standard Surface:**
– **Finish:** Smooth, even surface ready for finishing
– **Grit:** Typically 150-180 grit factory sanding
– **Consistency:** Uniform thickness, flatness across panel
– **Preparation:** May require additional sanding (220 grit) before final finishing for finest results
**Design Character:**
– **Modern/contemporary:** Smooth surface suits clean-lined contemporary designs
– **Versatility:** Works across design styles from minimalist to traditional
– **Finish showcase:** Smooth surface displays clear finishes beautifully
**Textured Surface Options:**
**1. Wire-Brushed/Textured:**
– **Process:** Mechanical brushing removes soft grain, leaves hard grain raised
– **Effect:** Tactile texture; enhanced grain visibility; rustic character
– **Applications:** Farmhouse, rustic-modern, coastal casual designs
– **Custom order:** Typically requires special order; not standard stock item
**2. Hand-Scraped:**
– **Process:** Surface mechanically distressed to simulate hand-planing
– **Effect:** Artisanal, handcrafted appearance; visible tool marks
– **Applications:** Traditional, old-world, craftsman-style interiors
– **Availability:** Custom fabrication; significantly higher cost
**3. Smooth (Fine-Sanded):**
– **Process:** Fine-grit sanding (220-320 grit) for glass-smooth surface
– **Effect:** Refined, polished appearance; maximum clarity
– **Applications:** High-end contemporary, minimalist, showcase installations
– **Finish advantage:** Clear finishes display wood character with maximum clarity
**Veneer Matching on Face:**
**Book-Matched Panels:**
– **Process:** Adjacent veneer leaves opened like book pages; mirror-image pattern
– **Effect:** Symmetrical, balanced appearance; formal quality
– **Applications:** Feature walls, architectural panels, formal spaces
– **Premium cost:** 15-30% upcharge for book-matching
**Slip-Matched Panels:**
– **Process:** Veneer leaves laid sequentially; repeating pattern
– **Effect:** Natural flow; less formal than book-matching
– **Applications:** Most standard plywood; casual, organic designs
– **Standard:** Typical construction method; no premium
**Random-Matched:**
– **Process:** Veneers selected for color/grain compatibility but not sequential
– **Effect:** Varied, natural appearance; no pattern repetition
– **Applications:** Rustic designs; situations where variation desired
– **Economy option:** Utilizes lower-grade veneers
—
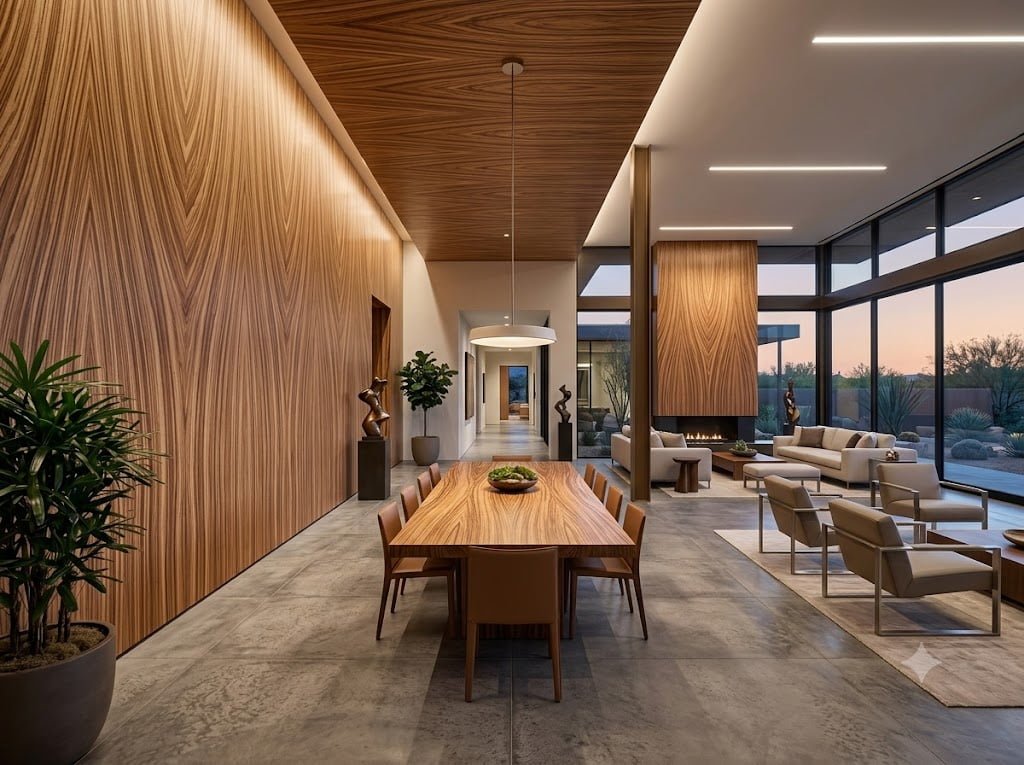
## Feature Wall Applications: Maximum Visual Impact
Feature walls represent parota plywood’s **highest-impact interior application**—transforming neutral spaces into memorable environments through material presence and visual character.
### Residential Living Spaces
**Why Feature Walls Effective:**
**Design Strategy:**
– **Focal point creation:** Draws eye; establishes visual hierarchy in space
– **Material warmth:** Balances cool-toned elements (concrete, metal, glass, gray paint)
– **Textural contrast:** Provides tactile richness against smooth painted surfaces
– **Architectural definition:** Creates spatial identity; makes rooms memorable
– **Personal expression:** Distinctive material choice reflects owner’s taste, values
**Optimal Wall Selection:**
**Primary Candidates:**
✅ **Fireplace walls:** Natural focal point; parota enhances prominence
✅ **Behind-sofa walls:** Main visual backdrop in seating arrangement
✅ **TV/media walls:** Frames media center; adds warmth to electronics
✅ **Bed headboard walls:** Creates hotel-suite ambiance in master bedroom
✅ **Entry statement walls:** First impression; sets home’s aesthetic tone
✅ **Dining room accent walls:** Provides richness for entertaining spaces
**Avoid:**
❌ **Window walls:** Blocks natural light; wastes premium material where not visible
❌ **Kitchen backsplash areas:** High moisture/cleaning demands; tile or stone better choice
❌ **Heavy art walls:** Competes visually with artwork rather than framing it
#### Living Room Feature Walls
**Design Specifications:**
**Panel Installation Methods:**
**Method 1: Floating Panel System (Premium):**
**Construction:**
– **Substrate:** 12-15mm (1/2″-5/8″) MDF or plywood backer attached to studs
– **Parota plywood:** 6-9mm (1/4″-3/8″) panels applied over substrate with adhesive
– **Reveal gaps:** 6-10mm gaps between panels (shadow lines)
– **Backer visibility:** Dark-painted backer visible in reveal gaps creates depth
**Advantages:**
✅ **Three-dimensional quality:** Shadow lines create depth, visual interest
✅ **Expansion accommodation:** Gaps allow minor panel movement
✅ **Contemporary aesthetic:** Clean, modern appearance
✅ **Installation forgiving:** Individual panels adjusted independently
**Installation Details:**
“`
1. Install substrate (MDF/plywood) flat to studs with appropriate fasteners
2. Paint substrate dark color (black, dark gray, dark brown)
3. Cut parota panels to size with 6-10mm gaps at all edges
4. Apply construction adhesive to panel backs (zigzag pattern)
5. Press panels to substrate; use temporary brads if needed for positioning
6. Remove brads after adhesive cures (fill holes)
7. Sand panel edges smooth; finish panels with clear coat
“`
**Method 2: Tongue-and-Groove System:**
**Construction:**
– **Panel edge treatment:** Router tongue-and-groove profiles on panel edges
– **Installation:** Panels interlock during installation
– **Substrate:** Optional (can attach directly to studs or over flat substrate)
– **Appearance:** Seamless or subtle reveal line where panels join
**Advantages:**
✅ **Continuous surface:** No visible gaps (if tight-fit desired)
✅ **Alignment assistance:** T&G helps maintain panel alignment
✅ **Traditional appearance:** Familiar wood paneling aesthetic
**Installation Details:**
“`
1. Router 6mm tongue on one edge, 6mm groove on opposite edge
2. Test-fit first; ensure panels interlock smoothly
3. If substrate used, install and paint as Method 1
4. Install first panel; verify plumb
5. Apply small amount of glue in groove
6. Insert tongue of next panel into groove
7. Tap gently to close; face-nail if necessary (conceal nails)
8. Continue across wall
9. Sand joints; finish entire wall uniformly
“`
**Method 3: Direct Application (Economy):**
**Construction:**
– **Substrate:** None (drywall surface or directly to studs)
– **Installation:** Panels glued and nailed directly to wall surface
– **Appearance:** Panels butted tightly or small reveals
**Advantages:**
✅ **Lower cost:** Eliminates substrate material, labor
✅ **Faster installation:** Fewer steps
✅ **Maximum room dimension:** No substrate thickness reducing room size
**Disadvantages:**
❌ **Wall flatness critical:** Any wall irregularities telegraph through panels
❌ **Limited adjustment:** Difficult to correct positioning after adhesive contact
❌ **Fastener visibility:** Nail holes visible unless filled expertly
**Finish Treatment:**
**Clear Finish Options:**
**1. Water-Based Polyurethane (Most Common):**
– **Advantages:** Low odor; fast drying; low VOC; non-yellowing; good durability
– **Sheen options:** Matte, satin, semi-gloss (recommend matte or satin for walls)
– **Application:** Brush, roller, or spray
– **Coats:** 2-3 coats typical
– **Drying:** Recoat in 2-4 hours; full cure 24-48 hours
**2. Oil-Based Polyurethane:**
– **Advantages:** Deepens/enriches wood color; excellent durability; classic appearance
– **Disadvantages:** Strong odor during application; longer drying; yellows over time; higher VOC
– **Application:** Brush or spray (avoid roller—bubbles)
– **Coats:** 2-3 coats
– **Drying:** Recoat in 6-8 hours; full cure 72 hours
**3. Hard Wax Oil (Premium Natural Option):**
– **Advantages:** Beautiful matte finish; easy maintenance/repair; natural appearance; enhances color depth
– **Disadvantages:** Less moisture protection; requires reapplication every 2-3 years
– **Application:** Wipe on with cloth; buff surface
– **Coats:** 2 coats typical
– **Drying:** 12-24 hours between coats
**4. Conversion Varnish (Commercial/High-Durability):**
– **Advantages:** Maximum durability; chemical resistance; professional appearance
– **Disadvantages:** Requires spray application; strong chemical odor; expensive
– **Application:** Spray only (professional application)
– **Coats:** 2-3 coats
– **Best for:** Commercial projects, hospitality applications
**Preparation Steps:**
“`
1. Sand panels to 220 grit (if factory sanding coarser)
2. Vacuum dust thoroughly
3. Wipe with tack cloth
4. Apply wood conditioner (optional—reduces blotching on some parota)
5. Let conditioner dry per manufacturer instructions
6. Apply first finish coat—thin, even application
7. Let dry completely
8. Light sanding with 320 grit (knock down raised grain)
9. Vacuum and tack cloth
10. Apply second coat
11. Repeat for third coat if desired
“`
**Lighting Integration:**
**Why
Comments